Side by Side Pictures

Put pictures side by side

Free to use in your browser. No account or app needed.
Drop photos anywhere, or paste with Ctrl V.Choose up to 24 photos from your device.

How to usePhotos stay on this device

Crop photo

Photo being cropped

How to put pictures side by side

Make side-by-side pictures online for free in three steps. Both photos keep their original proportions.

  1. Choose two pictures

    Click Choose photos and select both pictures, or drop both files onto the workspace. The first picture goes on the left and the second on the right.

  2. Keep them side by side

    Leave the layout set to Side by side. The pictures line up at the same height without cropping. For no gap between them, set Spacing to zero.

  3. Download one picture

    Check the framed preview, then click Download. Both pictures are saved together in one image. For a PNG or JPG, open Export options beside Download and choose the file format.

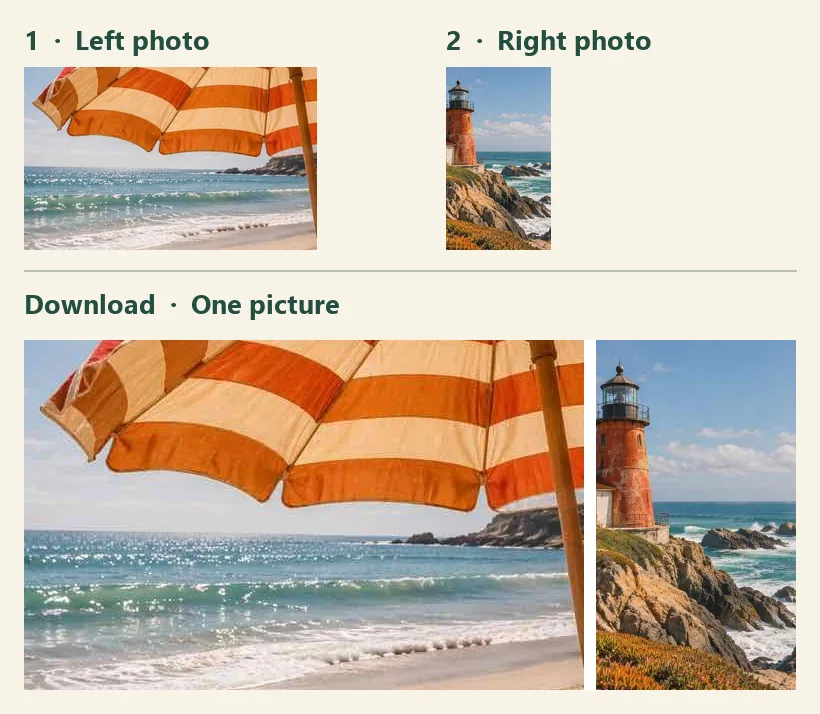
A wide beach photo and a tall lighthouse photo, followed by the downloaded image with the beach on the left and lighthouse on the right
Two source photos, one download. Both keep their full frame in the 772 × 350 pixel result.

Pick a layout for the pictures you have

Side by side

Use a horizontal row for before-and-after photos, different views of a product, or a few moments from a trip. Photos match the height of the shortest one. Vertical photos stay narrow and wide photos keep their full width. For a before-and-after comparison, place the earlier photo on the left and the later one on the right. Use photos taken from the same angle so the change is easy to see.

Drop a new photo beside an existing one or over its center to insert it. Park photos in the Spares strip on the right, or at the bottom on a phone.

Stack

Put pictures one above another to make a tall image. This works well for screenshots of a conversation or several steps in a recipe. Each photo scales to a common width and the order runs from top to bottom.

Crop repeated headers in the source screenshots and set Spacing to zero if the screens should meet edge to edge.

Grid

Choose two, three, or four columns for a contact sheet. Each square cell shows the full photo by default, including the top and bottom of a long screenshot.

Select a photo and use Size or drag a corner to zoom inside its cell. Open More photo options to adjust the crop position or resize freely in Freeform.

Freeform

Choose Freeform and drag a photo past any edge to extend the output in that direction. Drag the handle at the middle of an edge to add blank space. With a photo focused, use the arrow keys for small adjustments.

Drag a photo’s corner to resize it in proportion, or enter a percentage in Size. Drag empty workspace to pan. Choose Fit to see the whole output.

Optional: adjust and reuse a layout

For an uneven split, open Templates and drag the divider. To change which photo fills a slot, select a photo and choose Replace. Shape clips the whole composition. After downloading, choose Use last layout if you want the same arrangement next time.

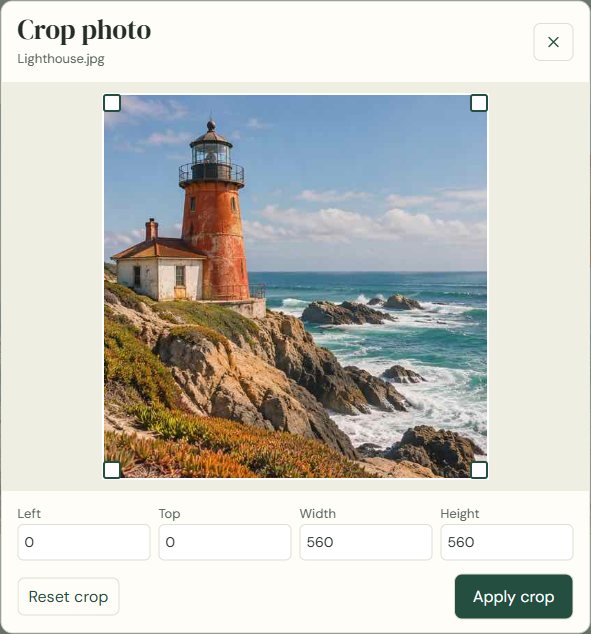
Crop photo dialog with an adjustable crop box on the lighthouse sample image
The crop box applies to the selected photo.

Keep every edge or crop a single photo

A landscape photo and a portrait photo can sit together with both frames intact. Rows start with equal heights, stacks with equal widths, and grid cells show each whole photo at 100% by default.

Double-click a photo in the output to crop it, or select it and choose Crop. Drag a corner of the crop box or enter the exact left, top, width, and height. Apply crop updates the output. Undo restores the previous crop in one step.

Choose a white, dark, or transparent background. Shape clips the whole collage, including the background. The area outside the outline is transparent in a PNG and white in a JPG.

Common questions

Back to the editor
Are my pictures uploaded or saved online?

The editor opens your photos on this device and combines them without uploading them to a server. Closing or refreshing the tab clears the composition. After export, the browser can remember the layout and settings. Saved layouts exclude your photos and filenames. How the site handles photos and browser data.

How do I put two pictures side by side without cropping them?

Add both pictures and keep the Side by side layout. The tool fits them to the same height, keeps their aspect ratios, and includes the full frame of each picture.

How do I put two pictures side by side on my iPhone and find the download?

In Safari, tap Choose photos and select both pictures. Keep the default Side by side layout to include both photos without cropping. Tap Download, then confirm the download when Safari asks. Open the Files app and look in Downloads for the combined picture. If you use a different download folder in Safari, check that folder instead.

How do I put two photos side by side on Android?

In Chrome, tap Choose photos and select both pictures. Keep the Side by side layout and tap Download. To find the saved picture, open Downloads in Chrome’s menu. Tap a photo to change its size, crop it, or move it to spares. The spare strip scrolls sideways on a phone. Tap a spare and choose Replace to pick the photo it should take the place of.

How can I keep my pictures sharp when I put them side by side?

Start with two pictures of the same pixel height. In the default row, taller photos scale down to match the shortest one. For example, two 1200 × 900 pictures at 100% size with zero spacing make a 2400 × 900 image. Choose PNG in Export options to avoid adding JPEG compression. Check the Output dimensions before downloading. Very large results scale down to fit within 8,192 pixels on the longest side and 16 megapixels overall. Zoom changes only your view of the workspace.

Which photo formats can I use?

The editor accepts JPG, PNG, WebP, and AVIF files that your browser can open, up to 25 MB and 80 megapixels each. Downloads are available as PNG and JPG. Copy puts a PNG on the clipboard.

Can I put more than two pictures side by side?

Yes. The workspace holds up to 24 photos across the output frame and spare area. All photos in your first selection go into the output. Use Add photos to bring in more.

How can I put one big photo beside two small ones?

Add three photos, open Templates, and choose Large on left. For a wide main photo with two underneath, choose Large on top. Drag the divider to resize the cells, or drag inside a photo to adjust its framing. Open Templates and choose Move main photo to flip the arrangement.

What happens when a template has more or fewer spaces than photos?

Click an empty slot or drop a photo into it. When switching to a smaller template, choose the photos to include. The others move to Spares. Dropping onto a full template adds a row. Undo brings the previous arrangement back.

How do I make a portrait collage or give it a shaped outline?

Open Templates and choose Portrait for a tall canvas. Each thumbnail shows the layout’s proportions and photo arrangement. Choose Shaped for a collage with a cutout outline. Download a PNG to keep the area outside the outline transparent, or choose JPG for white corners.

Why is Copy unavailable in my browser?

Image clipboard access depends on your browser and its permissions. If it is unavailable, download the picture and attach the saved file to your document or message.